Let’s upgrade to Windows 11 22H2 using Windows Update. Microsoft is rolling out Windows 11 22H2 upgrade via Windows Update and users with eligible devices can get 22H2 update by going to Windows Update Settings and selecting Check for updates.
According to Microsoft, users who are interested in experiencing the latest feature update can choose to do so by opening Windows Update Settings and selecting Check for updates. If your device is ready, you will see the option to Download and install Windows 11 22H2.
You can then check to see if Windows 11, version 22H2 is ready for your specific device by opening Windows Update settings (Settings > Update & Security > Windows Update) and selecting Check for updates
A lot of users reported that Windows 11 22H2 update was not appearing when checked for latest updates. However this issue seems to have been resolved now and Windows 11 22H2 update is now appearing for computers globally.
Upgrade to Windows 11 22H2 using Windows Update
The procedure to upgrade to Windows 11 22H2 using Windows Update is very easy. Use the following steps to get the Windows 11, version 22H2 update on your PC.
Step 1 – Check for Updates
On your Windows 11 PC, click Start and launch the Settings app. From the list of options, click Windows Update and select Check for Updates. Your PC will now check for the latest updates from Microsoft. Only the eligible updates for your PC will be listed.

Step 2 – Download and Install Windows 11 22H2
If you PC is eligible for Windows 11 22H2 upgrade, you’ll see Windows 11, version 22H2 update appears under Windows Update. Click Download & Install to begin the upgrade.

Accept the Windows 11 22H2 Software License Terms by clicking on Accept and Install.

Step 3 – Download Windows 11 version 22H2 Update
Your PC now downloads the Windows 11, version 22H2 from Microsoft. The PC will require a stable internet connection during the download process. Ensure your laptop is connected to a power source throughout the upgrade process.

Step 4 – Windows 11 22H2 Upgrade Installation
The Windows 11 22H2 update installation begins now. The installation progress is visible on the screen. Depending upon the PC configuration and download speed, the installation time will vary. I recommend leaving your PC idle during the Windows 11 22H2 upgrade.

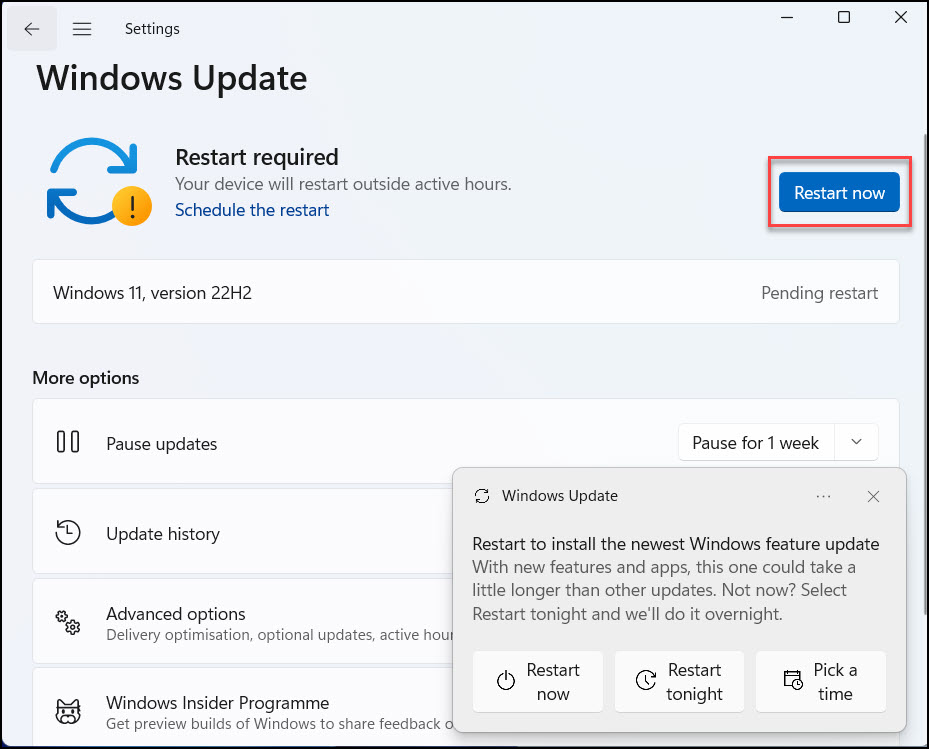
Step 5 – Restart your PC to complete the upgrade
After the Windows 11 22H2 upgrade is complete, you must restart your PC to complete the upgrade. Along with the Restart Now option, you also get additional options for restart. This includes:
- Restart Now – Reboot your computer now
- Restart Tonight – Restart your computer tonight
- Pick a time – Select this option to reboot your computer at a specific time
There is only a single restart required to complete the upgrade. To restart your computer immediately, click on Restart Now.
Step 6 – Verify the Windows 11 22H2 Upgrade
After you restart your PC, log in to your computer and let’s verify if the upgrade is successful. Click Start and type “About My PC” in the search box and launch it. On the About My PC window, scroll down and under Windows Specifications, you can verify the Windows 11 22H2 version details.
- Edition – Windows 11 Enterprise
- Version – 22H2
- OS Build – 22621.521

This completes the steps to upgrade to Windows 11 22H2 using Windows update. I hope I this guide helps you to get to Windows 11 22H2.